

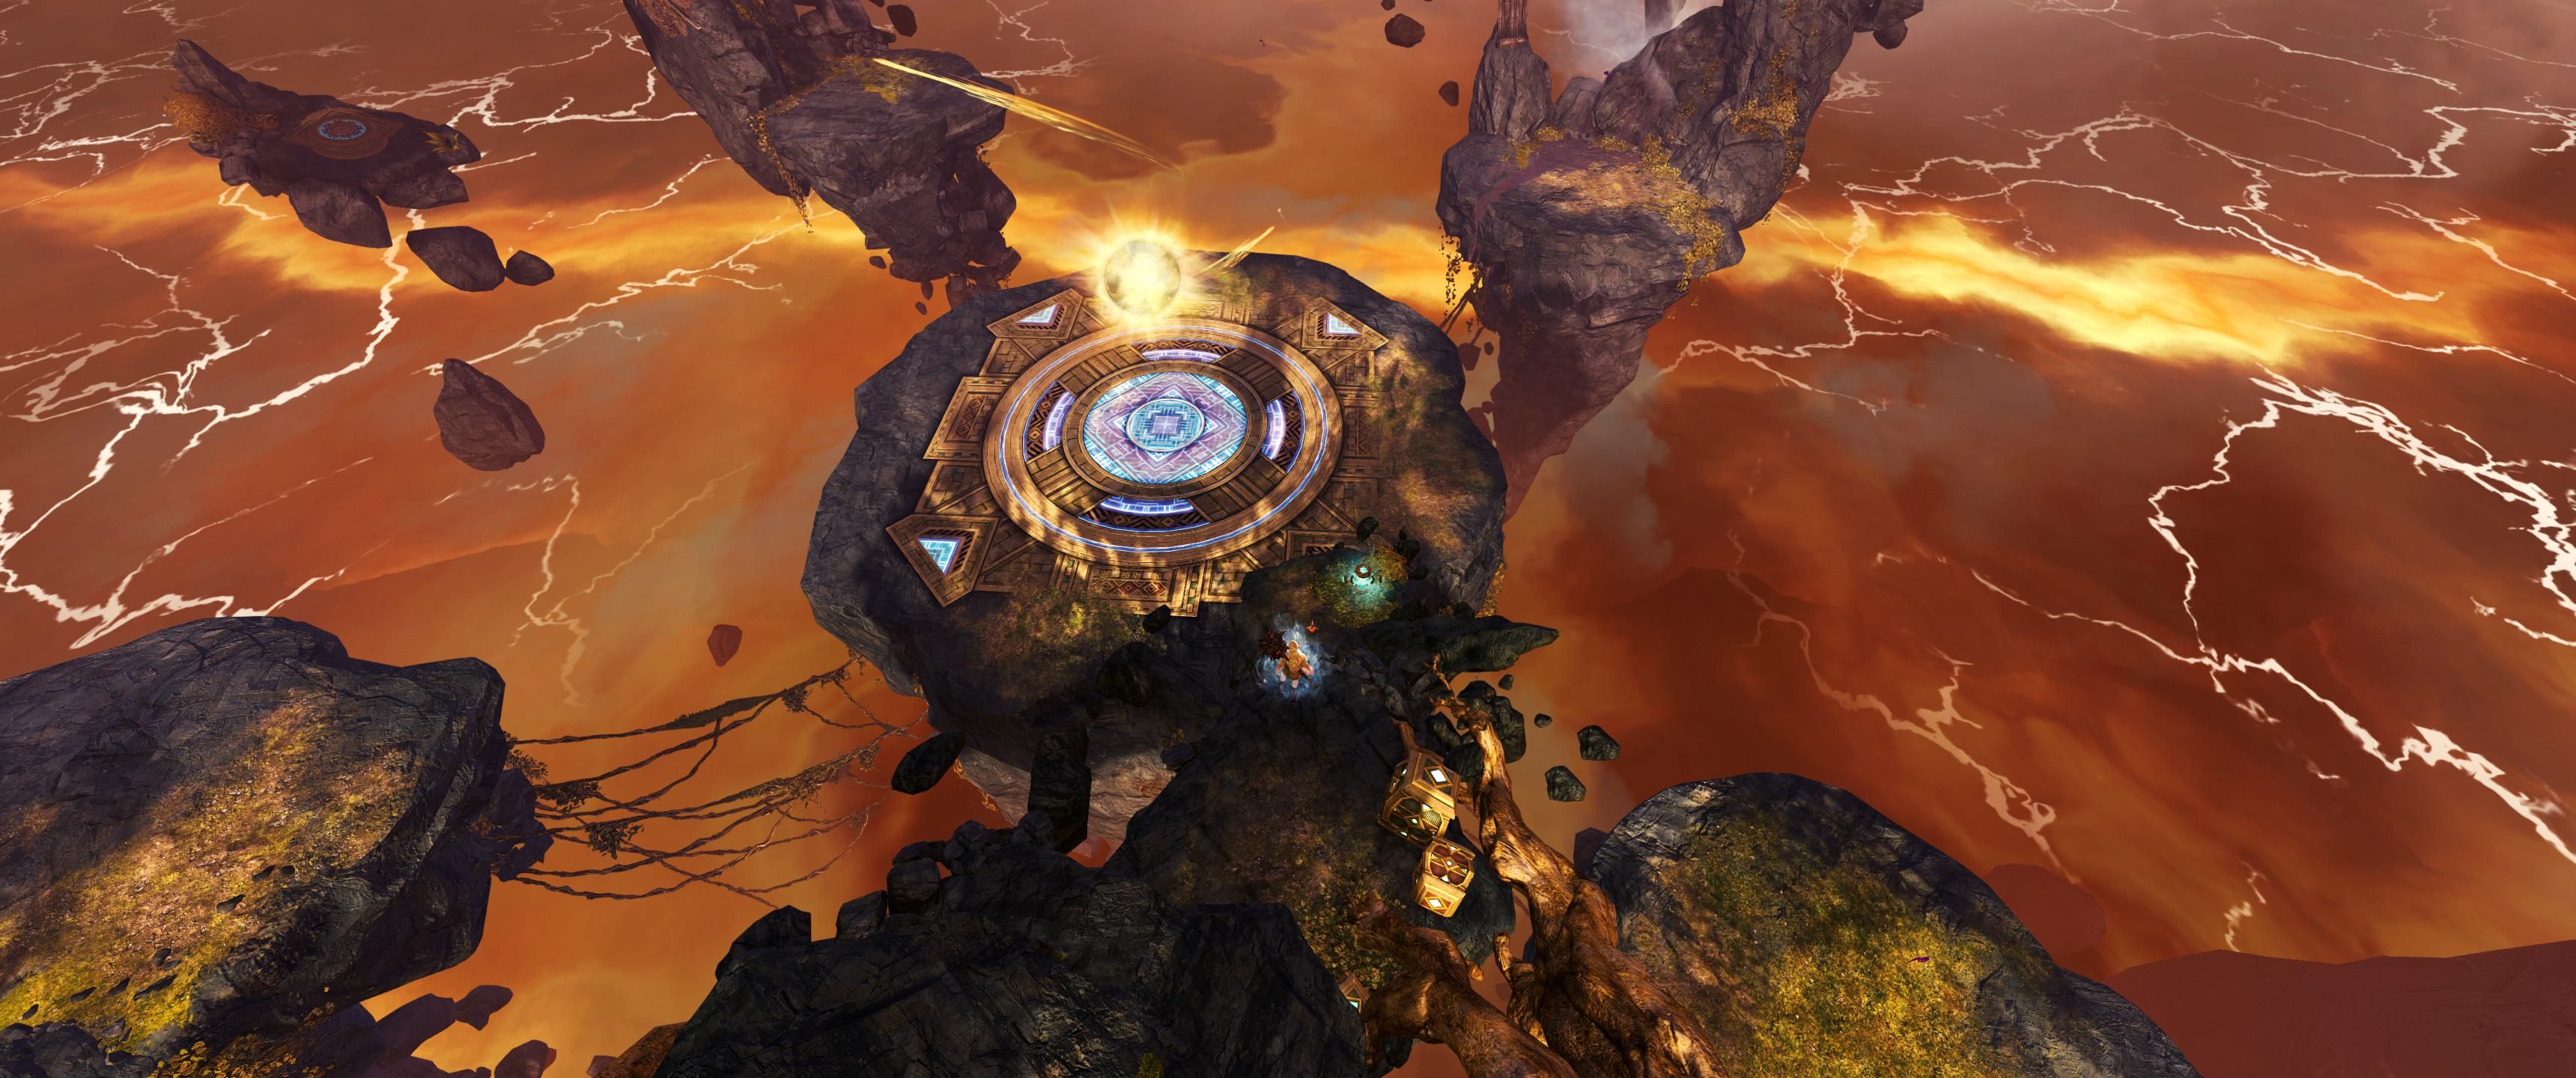
Skorvald the Shattered
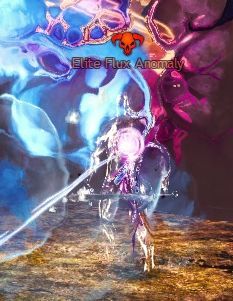
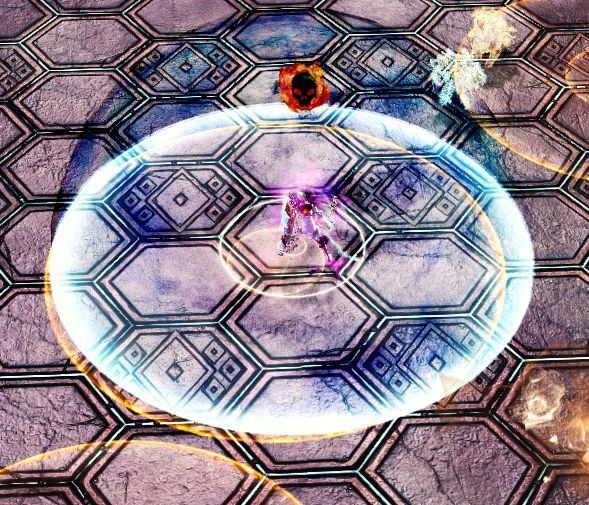
Skorvald the Shattered is the first boss in the Shattered Observatory fractal. He has 5,551,340 HP and requires 2200 CC units. The encounter has three phases separated by a mini event at 66% and 33% health of Skorvald. In this mini event the party has to kill four Elite Flux Anomalies which spawn on the islands in the Southwest, Southeast, Northeast and Northwest.
After accepting the Harbinger’s challenge, stack

Tactic Skorvald
The key to the fight is fast crowd control, as breaking Skorvald’s Defiance bar prevents most of the mechanics. Immediately break it at the start and bring him down to 66% health. Due to the size of the bar, every player has to contribute to CC. Your CC affects Skorvald, as soon as his HP bar appears in the top right corner, which enables you to precast some skills. Below you can find a full list of all attacks for further reference.
First phase (100%-66%): Skorvald is almost entirely stationary. Most attacks are well telegraphed and not significantly dangerous.
Second phase (66%-33%): Right after killing the fourth anomaly, Skorvald receives the
Third phase (33%-0%): Skorvald again receives
Tactic Island Mini Event
At 66% and 33%, Skorvald becomes immune to damage and the party has to kill four Elite Flux Anomalies to proceed. They spawn on the islands in the Southwest, Southeast, Northeast and Northwest and have to be killed subsequently in that order - the party can use air turbulences to travel between the islands. The Anomalies don’t have much health (170.244 HP) but knock players back with shockwaves. Pay attention to the animations and position yourself between Anomaly and wall.
Since most of the time is spent on the isle mini events, it is recommended to use your most damaging skills on the Elite Flux Anomalies. To move quickly between the islands, use leaps and other movement modifying skills. Always position yourself with the back to the wall of the island to avoid being knocked down.
Advanced Portal Strategy
It is worth placing a
Comprehensive List of All Attacks
| Solar Bolt | Skorvald often throws a red orb which splits into three after each bounce. Every orb leaves a |
| Horizon Strike | He marks orange triangles around him and blasts them counter-clockwise which deals high damage and |
| Crimson Dawn | Blasts the entire platform only excluding a small triangle behind him. Deals high damage. |
| Radiant Fury | Applies |
| Warp & Spiral Strike | Skorvard teleports to the target location and executes a spinning strike which damages players and applies |
| Punishing Kick & Cranial Cascade | Both attacks release a blast of chaotic mists with high damage and |
| Rush | Only below 66% health. Skorvald fixates on a player and charges through him from one edge of the platform to the other. |
| Focused Rage | Only below 66% health. Basically a larger version of _Cranial Cascade _. Skorvald marks a player with a cross-hair and blasts a large orange cone for high damage and |
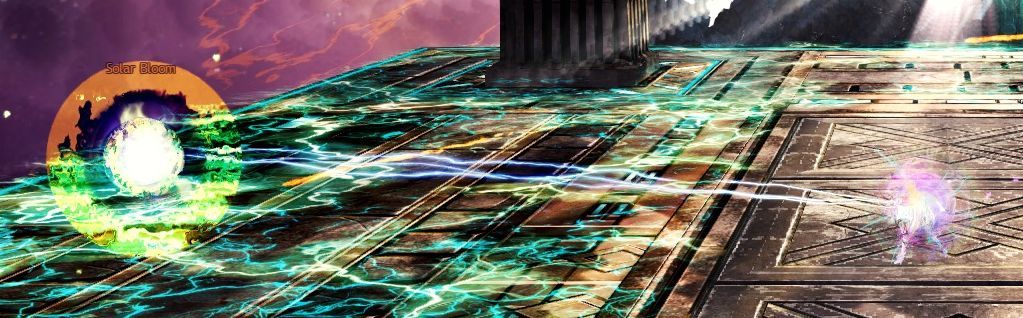
| Solar Bloom | Only below 50% health. Solar Blooms spawn on the platform which need to be knocked back by damaging them. They fixate on the closest player and explode for high area damage and |
| Beaming Smile | Only below 50% health. Skorvald teleports to a random location and summons three large and deadly laser beams. Move out to prevent instant death. He also projects a white beam onto players inflicting |
| Solar Cyclone | Only below 33% health. Skorvald starts spinning counter-clockwise and releases conical shockwaves similar to _Cranial Cascade _. There are small safe-spots between each shockwave, learn to stand inside them to avoid the high damage and interrupts. |
| Combustion Rush | Only below 33% health. Elite Flux Anomalies start charging through players and |
Intermediate Part
After Skorvald is dead, take the portal to the East and take the left portal in the control center area. You can activate a
You gain a new special action key: . For the moment, it is a 2100-range leap with stunbreak that blocks the next attack (1.75s
You will encounter several glass mobs on the way to the second boss, there are no differences to the regular Shattered Observatory. After the first group of mobs, you will have to bounce a white Globolla Marble nine times with your head to progress.
If you have a spare
Skip to Artsariiv (any class)
Artsariiv
The second boss of the fractal is Artsariiv. She has 5,962,266 HP and requires 2100 CC units. The encounter has three phases separated by a CC-heavy mini event at 66% and 33% health of Artsariiv. The first CC mini event requires 5x 650 CC, the second 9x 375 CC.
The encounter gets activated by bouncing a Globolla Marble into her, be sure to prepare
Artsariiv summons copies which split into smaller clones upon death, they use martial arts skills,
Tactic
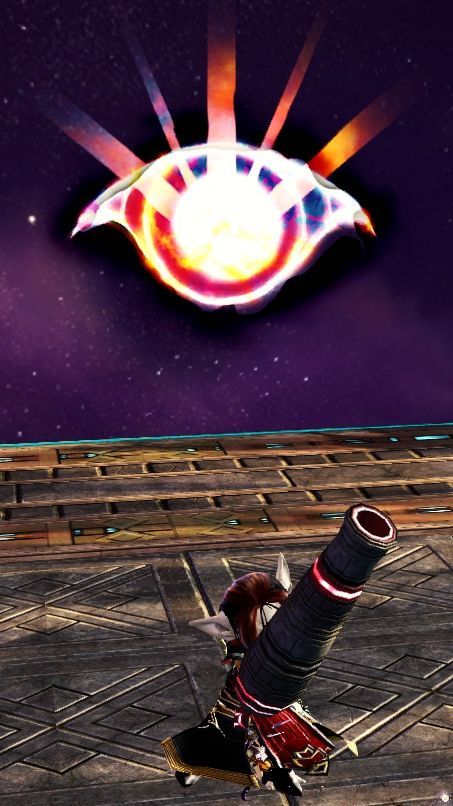
Immediately after the fight starts, Artsariiv channels her huge triple-laser attack Beaming Smile (similar to Skorvald at low health). Do not get caught within those lasers and turn away from the big red eye to prevent getting
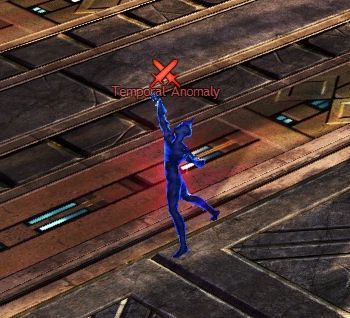
Kill the first Temporal Anomaly to spawn a containment for Corporal Reassignment and cleave the first set of clones. When you feel safe enough, move northwest to Artsariiv, break her defiance bar and bring her down to 66% health.
At 66% and 33% health, Artsariiv splits up into five and nine clones respectively. Those clones can’t be damaged and only despawn when their defiance bar is broken. All party members get resurrected afterwards, so don’t waste time to resurrect dead players.
The central clone has the highest priority as it shoots additional damaging orbs. Also pay attention to the single Globolla Marble during the CC phase, if it isn’t bounced it deals medium damage to the party.
After the crowd control phases are over, Artsariiv reappears in the middle of the platform and conjures an Obliterate attack and multiple orange void zones which need to be dodged. She also does her Beaming Smile attack similar to the start of the fight. Kill the respawned Temporal Anomaly and clones (optional) before switching to her again.
Below 66% health, Artsariiv throws a large Globolla Marble from time to time which needs to be bounced back to her over nine locations. Failing to bounce usually results in a party wipe, choose a reliable player beforehand to solo this (usually the profession with the least amount of damage
After the fight is over, take the portal in the North and move forward to get to Arkk.
Comprehensive List of All Attacks
| Beaming Smile | Similar to Skorvald below 50% health, Artsariiv generates three large laser beams and projects a white beam onto players which inflicts high damage, |
| Astral Surge | Artsariiv spawns a lot of small point blank area of effects (PBAoE) on the ground which deal medium damage, try to stay out of them when the inner circle reaches the outer. |
| Corporal Reassignment (Doom) | Designates a player for timed explosion, recognizable by a red skull above the target and a large notification message. The player must seek containment inside the white bubble in the center area or will kill himself and allies. The white bubble is only available after the respawning Temporal Anomaly is killed. This is the highest priority for any damage dealer. |
| Solar Discharge | From time to time, Artsariiv switches her location and moves to another corner. When doing so, she jumps over the platform and emerges a single Solar Discharge shockwave which applies |
| Red Marble | Artsariiv throws a lot of red orbs during the fight, watch out for a large Red Marble surrounded by red orbs - it deals |
| Slam | Deals |
| Mib Ring | Artsariiv herself and all her clones during the intermediate phases create a purple miasma field inside their hitboxes, don’t stand too close to avoid damage. |
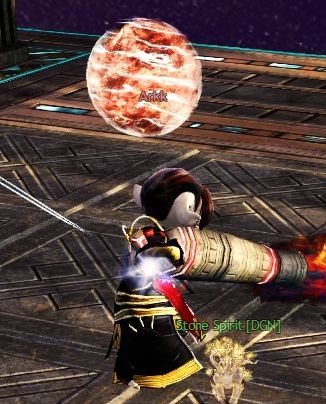
| Globolla Marble | Only below 66% health. Artsariiv throws a huge, white Globolla Marble which needs to be bounced back to her. The next position of the marble is always indicated by a large white circle, the next but one position by a smaller white circle. This part is typically soloed by the |
Arkk
Arkk is the third and final boss of the fractal. He has 9,942,250 HP and requires 1800 CC units. The encounter has five phases separated by a mini event at 80%, 50% and 30% as well as mini bosses at 70% and 40% health of Arkk. He is by far the most challenging boss in the fractal and requires a lot of practice to master. The last 30% of the fight can get very chaotic due to overlapping mechanics. However, all mechanics can be avoided and a healer is not mandatory. In contrast to the other enemies in this fractal, Arkk belongs to Scarlet’s army and
An attentive player may have noticed the special action key became even stronger now, doing medium damage, a 232
Tactic
Stack
Immediately when the fight starts, turn away as Arkk uses his Blinding Radiance ability. Always prioritize the respawning Temporal Anomalies, you only have a short time window to kill them before the player designated for Corporal Reassignment explodes. The doomed person can see a white circle collapsing below the Temporal Anomaly, the moment it completes the explosion goes off. Typically, using a ranged ability suffices for eliminating the anomaly, given that all team members actively contribute. Killing the anomaly triggers kill-based nourishments like
Solar Blooms 80%, 50%, 30%
When Arkk reaches 80%, 50% and 30% health, he gains
A common strategy is to assign four players to the spawning locations in the North, East, South and West, as the Solar Blooms fixate on the closest player a few seconds after their spawn. Players take aggro of their designated Solar Bloom and kite them clockwise to the next pillar on the right. You can also use direct damage skills to push back the Blooms.
The fifth, remaining player should be a DPS ready to take out a possibly spawning Temporal Anomaly during the phase. This player must also be ready to join the player with the green circle.
After every Solar Bloom phase, Arkk’s defiance bar has to be broken immediately or he kills all players. Use your ability for an additional
Elite Bosses 70%, 40%
At 70% and 40% of Arkk’s health, mobs from other fractals like the Elite Archdiviner from the Cliffside Fractal and the Elite Brazen Gladiator from the Chaos Isles Fractal respectively are summoned. Both bosses behave similar to their real version and are surrounded by four mobs (Cultists/Golems). Use
Do not stand in the AoE spawned by the Elite Archdiviner as they boonstrip.
Remember the party-wide
Final Phases <40%
Below 40% health, random platforms start disappearing temporarily. Due to this mechanic, space is very limited and resurrecting a downed player is nearly impossible. Sometimes Temporal Anomalies spawn on vanished platforms which makes the fight even more challenging.
The most important thing is to keep calm. Remember that every single ability can be avoided, the Solar Fury orbs, jump or dodge through the Starburst Cascade and Solar Stomp attacks, turn away from the Blinding Radiance and move accordingly to the Horizon Strike pattern. Keep a cool head and finish the fight!
Comprehensive List of All Attacks
| Blinding Radiance | Similar to the other bosses, Arkk has the white beam ability which damages players facing him and inflicts |
| Solar Fury & Solar Discharge | Arkk prepares this ability by conjuring a large red orb above his head. When the orbs disappears (after ~4 seconds), he launches bouncing orbs towards every player, leaving a |
| Corporal Reassignment (Doom) | The same mechanic as on Artsariiv. Designates a player for timed explosion, the party has to kill a Temporal Anomaly (56k HP) to spawn a containment for the target. |
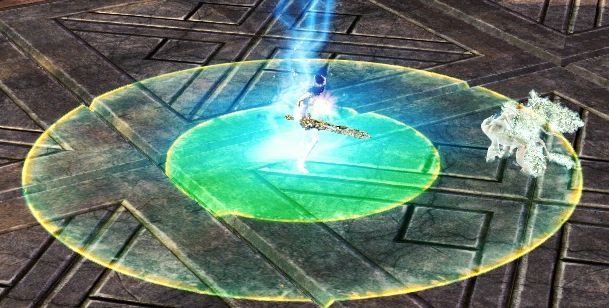
| Temporal Realignment (Green) | Similar to the green circle mechanic on Vale Guardian. Designates a player to take 80% of their health in damage, split between any nearby allies. Try to have at least three players inside the green circle. If no other player is inside the circle upon collapsing, it detonates the whole party. |
| Focused Rage | Similar to Skorvald, Arkk marks a player with a crosshair and blasts the area with damage and a |
| Horizon Strike & Diffractive Edge | Again, a mechanic taken from Skorvald. Arkk marks orange triangles around him and blasts them counter-clockwise. The first triangle is always the first to be blasted. Diffractive Edge is basically the same ability, it just blasts all triangles at the same time but leaves a small safe spot behind Arkk. |
| Starburst Cascade | Only below 60% health. Arkk sends out a wave of cascading energy across the platform, applying |
| Disappearing Platforms | Only below 40% health. In the final phase of the fight, random platforms temporarily disappear. If you fall through the ground, you will get teleported to above and start falling down - use your to get back into the fight. |
| Solar Stomp | Only below 40% health. Arkk vanishes in dust evading all attacks, when he reappears he stomps the ground, damages nearby enemies, executes a |
| Rolling Chaos | Only below 40% health. Recognizable by a small red arrow emanating from Arkk. Launches a rolling red marble in the designated direction which deals high damage. |
| Beaming Smile / DDR | Only below 30% health. Similar to the previous bosses, Arkk summons three large laser beams while simultaneously projecting the white beams onto players. Move out and turn away. |